
Olá pessoal, tudo bom?
Nesse post demonstro como preencher e também identificar quais itens foram selecionados em um determinado ListBox. Adianto que há várias formas de se popular um ListBox e neste post estou utilizando apenas uma delas. 🙂
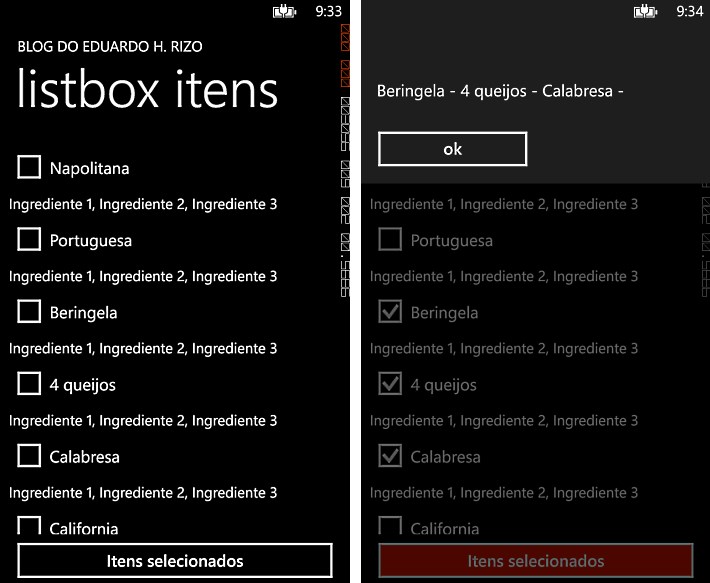
Tela de exemplo da APP desenvolvida para este post
Para popular o ListBox criei uma classe hipotética para representar sabores de Pizza (dados fixos mas poderiam vir do BD, XML ou mesmo WebService) e coloquei alguns valores de tal forma que eu tenha uma lista de sabores representada por um objeto List<Sabor>. Vejamos:
Classe Sabor (arquivo Sabor.cs)
using System;
using System.Collections.Generic;
using System.Linq;
using System.Text;
using System.Threading.Tasks;

namespace PhoneApp1
{
  public class Sabor
  {
    private int _codigo;
    public int Codigo
    {
      get { return _codigo; }
      set { _codigo = value; }
    }

    private string _nome;
    public string Nome
    {
      get { return _nome; }
      set { _nome = value; }
    }

    private string _ingredientes;
    public string Ingredientes
    {
      get { return _ingredientes; }
      set { _ingredientes = value; }
    }

    private bool _selecionado;
    public bool Selecionado
    {
      get { return _selecionado; }
      set { _selecionado = value; }
    }
  }
}
Abaixo temos o código desenvolvido em XAML para representação dos dados de nossa APP de exemplo:
Interface (arquivo MainPage.xaml)

Finalmente o código necessário para manipulação dos dados na interface. Veja a codificação abaixo:
Manipulação da interface (arquivo MainPage.xaml.cs)
using System;
using System.Collections.Generic;
using System.Linq;
using System.Net;
using System.Windows;
using System.Windows.Controls;
using System.Windows.Navigation;
using Microsoft.Phone.Controls;
using Microsoft.Phone.Shell;
using PhoneApp1.Resources;

namespace PhoneApp1
{
  public partial class MainPage : PhoneApplicationPage
  {
    private List Sabores;

    public MainPage()
    {
      InitializeComponent();
      //Método para popular o ListBox
      Preencher();
    }

    protected void Preencher()
    {
      Sabores = new List();
      Sabores.Add(new Sabor { Codigo = 1, Nome = "Napolitana", Ingredientes = "Ingrediente 1, Ingrediente 2, Ingrediente 3", Selecionado = false });
      Sabores.Add(new Sabor { Codigo = 2, Nome = "Portuguesa", Ingredientes = "Ingrediente 1, Ingrediente 2, Ingrediente 3", Selecionado = false });
      Sabores.Add(new Sabor { Codigo = 3, Nome = "Beringela", Ingredientes = "Ingrediente 1, Ingrediente 2, Ingrediente 3", Selecionado = false });
      Sabores.Add(new Sabor { Codigo = 4, Nome = "4 queijos", Ingredientes = "Ingrediente 1, Ingrediente 2, Ingrediente 3", Selecionado = false });
      Sabores.Add(new Sabor { Codigo = 5, Nome = "Calabresa", Ingredientes = "Ingrediente 1, Ingrediente 2, Ingrediente 3", Selecionado = false });
      Sabores.Add(new Sabor { Codigo = 6, Nome = "California", Ingredientes = "Ingrediente 1, Ingrediente 2, Ingrediente 3", Selecionado = false });

      lbSabores.ItemsSource = Sabores;
    }

    private void CheckBox_Checked(object sender, RoutedEventArgs e)
    {
      var check = sender as CheckBox;
      if (check != null)
      {
        Sabor s = check.DataContext as Sabor;
        s.Selecionado = true;
      }
    }

    private void CheckBox_Unchecked(object sender, RoutedEventArgs e)
    {
      var check = sender as CheckBox;
      if (check != null)
      {
        Sabor s = check.DataContext as Sabor;
        s.Selecionado = false;
      }
    }

    private void btnOK_Click(object sender, RoutedEventArgs e)
    {
      string selecao = "";
      foreach (Sabor s in Sabores)
      {
        selecao += s.Selecionado ? s.Nome + " - " : "";
      }
      MessageBox.Show(selecao);
    }
  }
}
Espero ter ajudado!
Post Relacionado:
Grande abraço,
Eduardo Henrique Rizo (@eduardorizo)
Fonte: Curso Windows Phone – Como preencher e identificar os itens selecionados em um ListBox
Comentários